-
Digital contacts
-
The purpose of the lecture: To learn how to declare variables, output messages through a serial interface monitor, apply conditional operators and distinguish the mode of operation of digital contacts.
The content of the lecture:
2.1. Output of the message Serial.println(), Serial.print().
2.2.1. Variables. Declaring and initializing variables.
2.2.2. Global and local variables.
2.3. Comparison operators.
2.4. Conditional if statement.
2.5. digitalWrite().
2.6. digitalRead().
Didactic units:variables, global variables, local variables, digital output, digital input, digital PWM signal.
2.1. Output of the message Serial.println(), Serial.print()
Using the Serial.println() and Serial.print() commands, you can display text messages and the results of arithmetic operations. For the first case, if we want to put the text of a message and display it on the screen, then by all means this text is placed in quotation marks, all placed inside one bracket. The difference between Serial.println() and Serial.print() is that in the first case it outputs a message from a new line, in the second case it outputs the message sequentially in only one line.
2.2.1. Variables. Declaring and initializing variables
Variables allow you to assign names and store numeric values so that they can be further used
in the sketch. For example, data from a sensor or a value used in calculations. As the name implies, variables can be changed at any time, unlike constants, whose value always remains the same.
Declaring and initializing variables. All variables must be declared before they can be used.
The declaration means defining the type and, if necessary, setting the initial value.
The last action is known as variable initialization. The variable only needs to be declared once. However, even after doing this, the value assigned to a variable can always be changed using calculations and assignments of different types.
Example
intVar = 10;// a variable with the name Varравной 10. intCat; // a variable with the name Car.
The first line of the code declares that Var is an int (integer) and that it has an initial value of 10. As soon as a variable is declared with a specific name, a value is assigned to it if necessary. This is done using the assignment operator, specified as the = symbol. The assignment operator tells the program to put what is to the right of it, i.e. the value 10, and the variable on the left, i.e. the name Var.
2.2.1. Global and local variables
Global variables. Such variables can be used by all functions in the program, hence the name. Global variables are declared at the very beginning of the program, before the setup() function. Variables that must be available to more than one function must be declared as global variables. This is done by declaring them at the very beginning код программы.Как можно see, the pin variable is used in setup functions() and loop( ) . Since both functions refer to the same variable, by changing its value in one function, we will change it in the other, since the variable is global.
Example of a local variable Example of a local variable
intpin = 13; void setup()
{…} voidloop()
{…}
voidsetup()
{intpin = 13;
…} voidloop()
{…}
Local variables. The second type includes local variables. They are declared inside the function. Only this function can see and use them. Variables declared inside a function are known as local variables. The pin variable is visible only to the setup() function. Therefore, it cannot be used in other parts of the code.
2.3. Comparison Operators
In C++, comparison operators are used to compare two or more mathematical values. A complete list of comparison operators used in arithmetic operations is presented in Table 1.
Table 1 – Conditional operators
Designation Meaning <
Меньше, чем
a < b
>
Больше, чем
a > b
<=
Меньше или равно, чем
a <= b
>=
Больше или равно чем
a >= b
==
Равно
a == b
!=
Не равно
a != b
2.3. Conditional if statement
The if statement is used to perform an operation in the case when the condition is true. As noted in the first lecture, the task condition is always written in parentheses, and the program itself is placed in curly brackets.
Запомнить!
if (условие)
{первое условиевыполняемой программы} else{второе условие выполняемой программы}
Пример
inta = 15; int b = 10;
void setup(){ if (a > b)
{Serial.print(a);} else
{Serial.print(b);}
}
void loop(){}
As shown in the example, after comparing the conditions, the program will display a message with the result 15.
2.3. digitalWrite()
The digitalWrite() function is used to supply a signal (voltage) from the microcontroller to the consumer, for example, an LED, a servo drive, a gear motor, various sensors, etc. The phrase digitalWrite means to send a voltage value to the digital port.To do this, we use the HIGH parameters if we want to apply voltage and turn off LOW. For example, to supply voltage to digital port number 8, digitalWrite(8,HIGH) is briefly recorded, if the voltage supply to the same port is turned off, then digitalWrite(8,LOW) is recorded.
Запомнить!
digitalWrite(pin, value) pin –номерконтакта
value – значение HIGH или LOW
Let's conduct a visual, simple experiment related to checking the presence of voltage in a digital contact. To do this, it is enough to take a multimeter for measuring voltages and an Arduino Uno board. Connect them as shown in Figure 2.1.
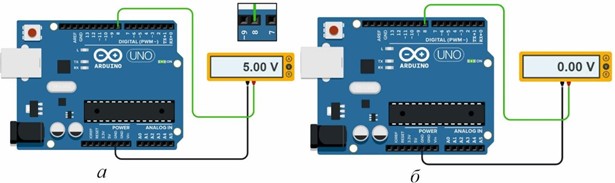
Fig.2.1.Circuit for measuring voltages with a multimeter:
(a) when turned on with the HIGH command; (b) when turned off with the LOW command.
Thus, the voltage reading on the display of the 5V multimeter corresponds to digitalWrite(8,HIGH), and turning it off corresponds to the digitalWrite(8,LOW) function.
2.4. digitalRead()
The digitalRead() function is used to get information from an external device connected to a specific port. Such a device can be a button or any sensor that generates a high or low signal level, depending on the situation. After receiving a signal, we can react to it somehow: turn on the LED, make a sound, start the engine or sensors of sensitivity, distance, temperature, etc.
Запомнить!
digitalRead(pin)
pin–номер цифрового вывода, с которого происходит считывание Возвращаемые значения:HIGH илиLOW
Here is an example related to connecting a circuit and using the digitalRead() function.If we supply voltage, for example, from a battery to digital port 8 (although not necessarily a battery), the microcontroller, accepting this voltage, will fix it as a digital signal equal to 1, i.e. the voltage is Read. This signal can be output via messages (Fig. 2.2, a). If the contact is disconnected (for example, switching to another port with the code left), there is no signal, in this case the value 0 will be displayed in the message (Fig.2.2, b).
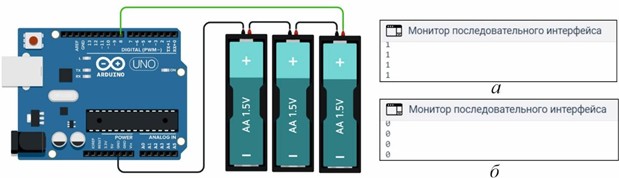
Рис. 2.2. Функция digitalRead() выполняет роль: (а) – при считывании значения напряжений (сигнал: 1);(б) – отсутствие в контакте напряжения (сигнал: 0).
To display the message of digital signals on the serial interface monitor, we implement the program written in Listing 2.1.
Листинге 2.1. digitalRead()
int pin = 9; boolean mean; void setup(){ Serial.begin(9600);
pinMode(pin, INPUT);
}
void loop(){
mean = digitalRead(pin); Serial.println(mean); delay(300);
}
In this program listing, two variables are declared at the beginning, one integer variable named pin, the second variable is a boolean boolean data type. This data type accepts only two values true or false, 1 or 0, i.e. in our case it determines whether there is a signal in the contact or not. Next in the void setup function()we establish contact with the pinMode input mode (pin,INPUT). In the execution function, we read the signal from the digitalRead(pin) port and assign it the name of the mean variable. The true or false value of this variable determines the boolean data type. If it is true, then using the message Serial.println(mean)1 will be displayed, if not, then 0.
-
Opened: дүйсенбі, 6 қазан 2025, 12:00 AMDue: дүйсенбі, 13 қазан 2025, 12:00 AM
-