-
Stepper motor
-
The purpose of the lecture: To familiarize with the characteristics, the role in robotics of a stepper motor and their connection to the Arduino board.
Содержание лекции:9.1. The role of stepper motors. The principle of operation.
9.2. 28BYJ stepper motor with control board.
Didactic units: sound sensor, stepper motor, control board.
9.1. The role of stepper motors. Technical specifications.
To date, the use of stepper motors is one of the simplest, cheapest and easiest solutions for the implementation of systems in the field of mechanical engineering, in various CNC machines and robotic complexes.
By design, stepper motors consist of a stator and a rotor. Permanent magnets are installed on the rotor, and coils are included in the stator. The essence of the work is as follows. Suppose there are four stator coils and one rotor. The coils are installed at an angle of 90 ° and are not connected to each other in any way (Fig.9.1). The question arises, what happens if we supply alternating current to one of the coils with a time interval, for example, 1 second? When an alternating current is applied to one of the coils, a magnetic field will form around the coil itself. In this case, the magnetic field of the coil will interact with the magnetic field of the rotor, which has its own magnets with different poles. Under the influence of magnetic fields, the motor shaft will rotate 90° perpendicular to the installed stator, which is supplied with alternating current.
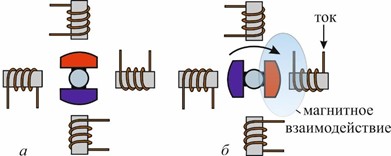
Рис. 9.1. The principle of operation of the stepper motor
The 28BYJ-48 is a 5 volt stepper motor with a gearbox. The gear ratio of the gearbox is approximately 64:1, which allows you to get a shaft rotation speed of ~ 15 rpm. The general view of the 28BYJ-48 stepper motor with the ULN2003 driver is shown in Figure 9.2.
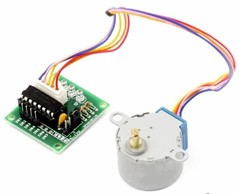
Fig. 9.2. Stepper motor with driver
Purpose of the ULN2003 driver. The digital output of the microcontroller can output a current of ~40 mA, and one stator winding inside the 28BYJ-48 motor consumes ~320 mA at peak, therefore, if the motor is connected directly, the microcontroller will fail. For protection, the ULN2003 stepper motor module was developed, which uses the ULN2003 chip, which allows you to control a load of up to 500 mA. In addition to the ULN2003 chip itself, the board has a five-pin connector for connecting to the motor and four LEDs A, B, C and D, showing which of the windings is powered at the current time (Fig. 9.3).
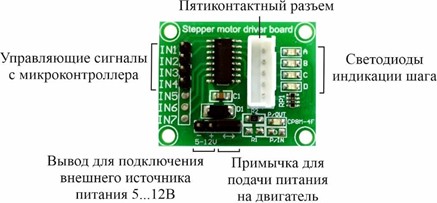
Fig. 9.3. ULN2003 Driver Device
At the bottom there is an output socket for connecting an external 5.12 source, the installation of which allows you to supply power to the stepper motor. It should be noted that it is not recommended to supply voltage from the Arduino board itself, since the motor can consume current exceeding the capabilities of the Arduino. To do this, it is better to use an external voltage source in the range of 5 ... 12 V and with a current of at least 1A. There is a jumper nearby that serves to turn on or turn off the power from the engine.
There are four control inputs from the Arduino microcontroller on the side. They are marked as IN1, IN2, IN3 and IN4 and must be connected to the four digital pins of the Arduino.
Let's give an example, connect the downloaded Stepper 28BYJ library and write the program code in which the engine will make one full turn clockwise and one full turn counterclockwise (listing 9.1).
Listing 9.1. Stepper motor
#include <Stepper_28BYJ.h>
Const int stepsPerRevolution = 4096; Stepper_28BYJ myStepper(STEPS, 8, 9, 10, 11); void setup(){
myStepper.setSpeed(3);
}
void loop(){
Serial.println(po chasavoi strelke); myStepper.step("stepsPerRevolution"); delay(500);
Serial.println("protiv chasavoi strelke");

For the stepper motor to function, you must first connect its library #include <Stepper_28BYJ.h>. Declare a variable named stepsPerRevolution and assign an integer value of 4096, meaning the number of steps per revolution, in accordance with the documentation of the engine. Next, initialize the Stepper_28BYJ library to outputs 8,9,10 and 11 with a given name, for example, myStepper. In void setup() we set the speed to 3 rpm, this is the maximum integer speed for this engine myStepper.setSpeed(3). Next, in the execution function, we make 1 revolution in one direction, counterclockwise myStepper.step("stepsPerRevolution"), after a pause of half a second, we make 1 revolution in the other direction clockwise myStepper.step(-stepsPerRevolution).
-