-
Photoresistor
-
The purpose of the lecture: to study the principle of operation of the while, do...while cycle, the principle of operation of a photoresistor.
The content of the lecture:
1.1. While, do...while cycle.
1.2. Photoresistor.The purpose of the photoresistor.
Didactic units: while cycle, do...while cycle, photoresistor, resistance.
4.1. Цикл while, do…while
Let's consider the first case with the while loop.The while loop operator is a loop that repeats the same action as long as the loop continuation condition remains true.
Запомнить!
While(условие продолжения цикла)
{код выполняемой программы}
The loop continuation condition must be true, as soon as the condition becomes false, the loop is exited. Let's consider an example of a cyclist moving at an initial speed of 5 km/h. Let's set a condition for the cyclist's movement, if his speed is reached at 25 km / h, then the cycle will be interrupted, if not, then we will increase it at intervals of 5 km / h.The result of the cycle is shown in Figure 4.1.
Листинг 4.1. Цикл While
int speed = 5; void setup()
{Serial.begin(9600); while(speed < 25)
{speed += 5; Serial.println(speed);}
}
void loop(){
}

Figure 4.1. Output of the calculation of the cyclist's speed.
Let's explain the execution of the program in Listing 4.1. At the beginning, the variable speed is declared and initialized. Next, the compiler checks the condition of the while loop, 5
< 25 = true. The program enters the loop and performs the operation of outputting the first value to the monitor Serial.println(speed). Next, the value 5 is added, now speed = 10. The check 10 < 60 = true is performed again, displays a message. The condition is true, the value in the variable changes, speed = 15, displays the message again. Thus, successive iterations of the cycle are performed, the speed variable still accepts
these values are 20 and 25. The last change to the speed variable causes the condition in the while loop to become false 30 < 25 = false, and the while loop is exited. Thus, 5 repetitions were performed, while speed = 25 with this variable value, the while loop ended.
Now consider the do...while loop. The structure is very simple, as you can see, the condition is at the end of the loop, respectively, and the condition check will be performed after the code in the body of the loop is executed. Note that the condition is checked at the end of the loop, not at the beginning, so that the code block in the body of the loop will be executed at least once. If the condition is true, the loop jumps back to the beginning and executes it again. The do...while loop is almost the same as the while loop, except that the body of the loop is guaranteed to be executed at least once. The while loop first checks the condition, and then executes a block of code in the body, of course, if the condition is true, while do...while first executes the code in the body of the loop, and then checks the condition, and if it is true, then it continues to work. An example of how the do...while loop works (Listing 4.2).
Листинг 4.2. Циклdo…while
int a = 0; void setup(){
Serial.begin(9600);} void loop(){
do {Serial.println("Hello, ATT");}
while(a!=0);}
Результат работы цикла do…whileпредставлена на рисунке 4.2.

Fig.4.2. Message output using the do...while loop
This do...while loop first executes the code enclosed in curly brackets Serial.println("Hello, ATT"), and then the condition a!=0 is checked. Since this is a cycle increasing by one, the condition is always met, and therefore the message
"Hello, ATT" will be output indefinitely.
4.2. Photoresistor. Purpose of the photoresistor
A photoresistor is a sensor whose electrical resistance varies depending on the intensity of the light incident on it. The more intense the light, the more free charge carriers are formed and the lower the resistance of the element becomes. The general view of the photoresistor is shown in Figure 4.2..
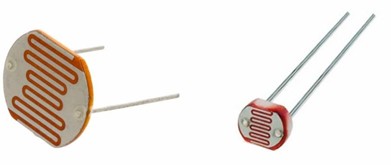
Figure 4.2. Photoresistor
Let's do a little modeling on a photoresistor. Let's put a light on it and measure its resistance. To do this, take a multimeter (Fig.4.3). If we apply light more intensively to the photoresistor, then the resistance in it will be applied. In a multimeter, the photoresistor value decreases to a value of ~ 506 ohms (Fig.4.3, b). If we cover the photoresistor with our palm, we will find an increase in resistance on the dial of ~ 180 kOhm (Fig.4.3, a).
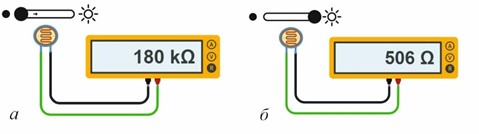
Fig.4.2. Measuring the resistance of a photoresistor:
(a) – in the dark; (b) – when pointing the light.
With the help of a photoresistor, many light-related projects can be carried out. For example, the automatic switching on of a lamp in a room at evening; an alarm indicating the appearance of a person who turned on the light in the room; in the printing industry to detect paper tape breaks, control the number of sheets of paper fed into the printing machine; and in other industries on an industrial scale.
-
Opened: Monday, 6 October 2025, 12:00 AMDue: Monday, 13 October 2025, 12:00 AM
-