-
Gas and distance sensor
-
Lecture plan:
1. MQ-2 gas sensor
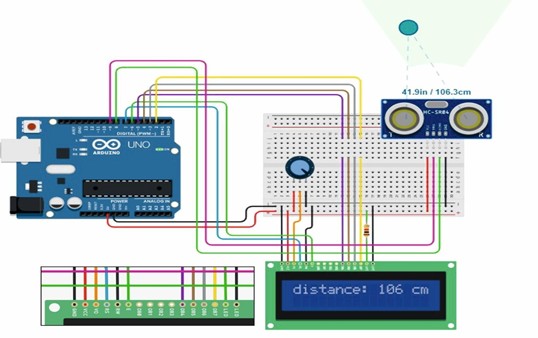
2. HC-SR04 distance sensor
3. Connecting the distance sensor to the LCD screen
The MQ-2 gas sensor allows you to register the concentration of gases such as hydrogen, smoke and combustible hydrocarbon gases (methane, propane, butane). The sensor belongs to the widespread MQ sensor family. This family of sensors has gained popularity due to its low cost and ease of use. The sensor has an analog and digital output. A signal is sent to the digital output when a certain threshold of gas concentration is exceeded, which is adjusted by a resistor (Fig.1).
The gas concentration is measured in ppm. It stands for parts per million (parts per million). Thus, 1 ppm corresponds to a concentration of 0.0001%.
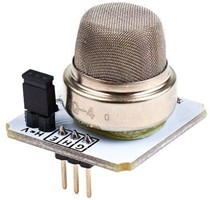
Fig.1. General view of the MQ-2 gas sensor The main characteristics of the MQ-2 gas sensor: 1) sensor supply voltage
5V; 2) current consumption 180 mA; 3) sensitivity range 300...10000 ppm; 4) operating temperature from -10 to +50 °C;
1. Temperature message output via the monitor port
Let's set up a primitive experiment with a gas sensor and display the sensitivity values through the monitor screen.
Experiment 1
Required materials:
1. Arduino UNO Microcontroller – 1 pc.
2. Gas sensor – 1 pc.
The MQ-2 gas sensor has six legs: A1, B1, H1, H2, B2 and H2. In order to connect the gas sensor, connect all three ends A1, B1 and H1 as a single unit and apply a voltage of 5V there (Fig.2). At the other end of the three legs A2, B2 and H2, we connect the grounding to two ports and one to the analog port.
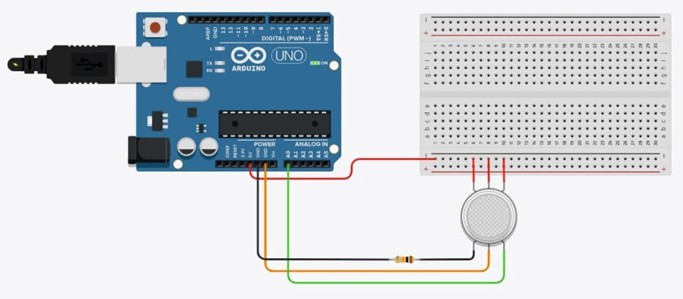
Fig.2. Gas sensor connection diagram
For the device to function, it is necessary to write the program code, which is presented in Listing 10.1.
Листинг 10.1. Вывод сообщения чувствительности газа через порт монитора
int gas = 0; void
setup()
{
Serial.begin(9600);
} void loop()
{
gas = analogRead(A0); // считывание напряжения в А0 Serial.println(gas);// вывод сообщения цифровых значений delay(30);}
Результат вывода сообщения чуствительности газа представлена на рисунке 3.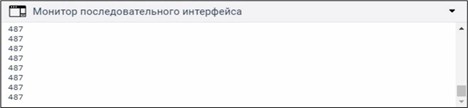
Fig.3. The result of the digital values message output via the monitor port
If we want to connect only the distance sensor or along with the distance sensor with other components, then we need to familiarize ourselves with the sensor device and make sure that it is connected correctly to the Arduino.
HC-SR04 Distance Sensor
The distance sensor is a non-contact type device and provides high-precision measurement and stability. The range of its measurement range is from 2 to 400 cm. Its operation is not significantly affected by electromagnetic radiation and solar energy. In our experiments, we will use an ultrasonic rangefinder of the HC-SR04 brand (Fig. 4).

Fig.4. General view of the distance sensor HC-SR04
Operating parameters of the distance sensor: supply voltage – 5V; current – 15 mA; viewing angle – 15°; measuring angle – 30°. The sensor is equipped with four terminals: power contact – 5V; Trig (T) – output of the measurement start signal from the Arduino to the sensor; Echo (R) – output of the measured data from the sensor to the Arduino; grounding (GND) – Ground output.
Let's set up a visual experiment, write a small program code and output messages of the distance to the object.
Experiment 2
Required materials:
1. 1. Arduino UNO Microcontroller – 1 pc.
2. 2. HC-SR04 distance sensor – 1 pc.
We connect the circuit as follows. Connect the 5V power supply to the VCC on the sensor, connect the Trig to port 8, connect the Echo to port 9 and connect the ground to GND (Fig.5).
Fig.5. Distance message output via the monitor port
The program code for displaying the distance message through the monitor port is presented in Listing 10.2.
Листинг 10.2. Вывод сообщения расстояния через порт монитора int PIN_TRIG = 8; // объявляем целочисленные int PIN_ECHO
= 9; // переменные 8 и 9 long duration, cm; void setup() { Serial.begin(9600);
pinMode(PIN_TRIG, OUTPUT); // устанавливаем порты pinMode(PIN_ECHO, INPUT); // в режиме выхода и входа
} void loop()
{
digitalWrite(PIN_TRIG, LOW); delayMicroseconds(5); digitalWrite(PIN_TRIG, HIGH); delayMicroseconds(5); digitalWrite(PIN_TRIG, LOW);
duration = pulseIn(PIN_ECHO, HIGH); // считывание длину cm = (duration / 2)/29.1;
// сигнала Serial.print("distance: ");
Serial.print(cm); Serial.println(" cm."); delay(30);}
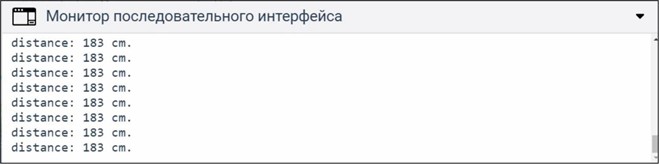
The essence of this program is as follows. At the beginning, we declare integer variables for two ports, then set them in the body of the void setup() function. We set the voltage supply modes to turn on and off with a delay of 5 microseconds to the distance sensor, then from the sensor to the Arduino we supply voltage to read the signal lengths using the pulseIn() function. The received signal length is converted to a distance according to the formula (duration / 2)/29.1 and is output to the serial interface monitor message (Fig. 6).).
-